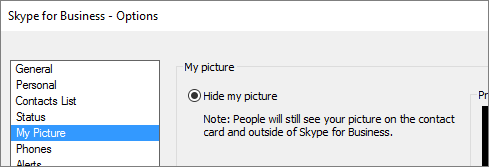
Set My Picture options in Skype for Business
The My Picture options window in Skype for Business is where you can change your sign-in settings to speed up the sign-in process, specify presence and calendar meeting information to display to others in Skype for Business, and tell Skype for Business how you want it to interact with other Office programs.
Important: If the Edit or Remove Picture button on the My Picture options window is dimmed (not available), your organization has turned off the option that allows users to change their picture settings. See your technical support staff if you have questions about this policy.
Here's how to access the My Picture options window:
- In the Skype for Business main window, click the Options button
 and select My Picture, or click the arrow next to the Options button
  and select Tools > Options.

- On the Options page, select My Picture.

Note: If you've selected Show Menu Bar, you can open the options menu from the Skype for Business main window by clicking Tools > Options and then selecting My Picture.
Hide my picture
Depending on how Skype for Business has been set up, you might be able to hide your picture from other Skype for Business users. Your contacts will see a blank outline of a person’s head instead of your picture.
- To hide your picture from other Skype for Business users, click Hide my picture, and then click OK.
Show my picture
If your organization has set up Skype for Business so it shows people’s pictures with their other contact information, your corporate directory picture is automatically displayed. If you’re satisfied with the picture, you don’t need to make any changes to the settings in this window.
Change my picture
If the Edit or Remove Picture button is dimmed, your organization has decided not to let users change their pictures. If you can change your picture, here’s how to do it.
Use a picture from your computer or an external drive
Click Edit or Remove Picture.
An Outlook window will open, depending on how your system has been set up.
If you’ve been taken to an Exchange window, do the following:
Click Edit Icon > Upload photo > Browse.
In the Change Photo window, click Save. If a message is displayed that asks if you want to close the window, click Yes.
Navigate to where your replacement picture is stored (this can be on your computer or on an external or network drive). Your replacement picture can be any size or type, including HD (high-definition).
Double-click the file.
Note: After you’ve changed your picture, it may take a little while before the new picture appears.
Related Articles
Calling| Advanced
Manage your call settings in Teams To change call settings, click your profile picture at the top of Teams, then click Settings. In the General section, you can select either Microsoft Teams or Skype for Business as your default calling app. In the ...How do I set up my billing profile?
1. An email will come for you to set up your account billing details. 2. Complete your billing profile as requested: 3. Once completed, you will be redirected to Team Venti’s website to confirm your information has been successfully saved: For ...Use the Exchange Admin Center to set up email forwarding
In the Exchange Admin Center, navigate to Recipients > Mailboxes. In the list of user mailboxes, click or tap the mailbox that you want to set up mail forwarding for, and then click or tap Edit. On the mailbox properties page, click Mailbox Features. ...Self-service migration of email and contacts to Office 365 for business
This is part of a Microsoft self-service article titled Set up Office 365 for business. One mailbox: How to import email, contacts, and calendars to Office 365 Here are the different methods you can use to copy email, contacts, and calendars to ...Guide for Team owners
As a team owner, you can add new members and guests, change members into owners, manage channels and settings, and archive a team that's no longer in use. Add members In the teams list, go to the team name and select More options > Add members. Type ...