Manage your users in Office 365
As an admin for Office 365, you can manage users in the Office 365 admin center preview. The people on your team each need a work or school account before they can sign in and access Office 365 for business. You can also remove users and reset your user's passwords if they forget it.
Add users individually to Office 365
The people on your team each need a user account before they can sign in and access Office 365 for business. The easiest way to add user accounts is to add them one at a time in the Office 365 admin center. After you do this step, your users will have Office 365 licenses, logon credentials, and Office 365 mailboxes.
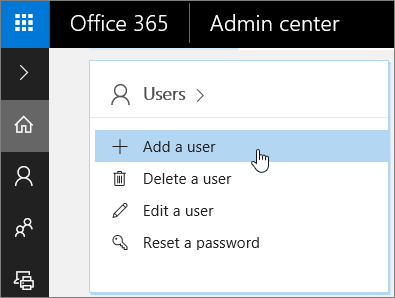
1. On the Home page, choose Add a user.
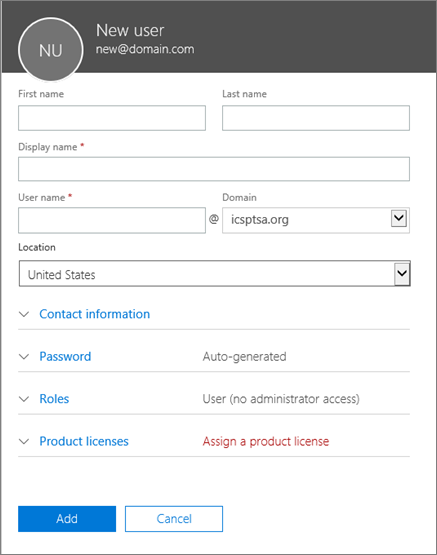
2. Fill in the information for the user. Choose Add when you are done.
Name — Fill in first, last, display name, and user name.
Domain — For example, if the user's username is Jakob, and his domain is contoso.com, he'll sign in to Office 365 by typing jakob@contoso.com.
Contact information — Expand to fill in a mobile phone number, address, and so on.
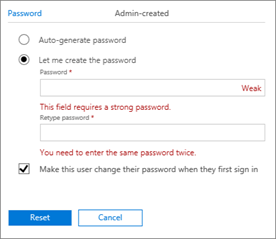
Password — Use the auto-generated password or expand to specify a strong password for the user. They'll need to change their password after 90 days. Or you can choose to Make this user change their password when they first sign in.
Roles — Expand if you need to make this user an admin.
Product licenses — Expand this section and select the appropriate license. If you don't have any licenses available, you can still add a user and buy additional licenses.
After you add a user, you'll get an email notification from the Microsoft Online Services Team. The email will contain the person's Office 365 user ID and password so they can sign in to Office 365. You need to tell your new user about their Office 365 sign in information. Use your normal process for communicating new passwords.
Delete a user from your organization
Before you delete a user from your Office 365 business subscription, we recommend you save the user's email and OneDrive data, and take other steps to protect your business.
Delete one or more users from Office 365
IMPORTANT: Don't delete a user's account if you've converted it to a shared mailbox or if you've set up email forwarding on the account. Those functions need the account there. If you've converted it to a shared mailbox, you can remove the license from it so you aren't paying for it. If you set up email forwarding, you cannot remove the license. Doing so will stop the email forwarding and inactivate the mailbox.
- Go to the Office 365 admin center.
- In the Admin center, select Users.
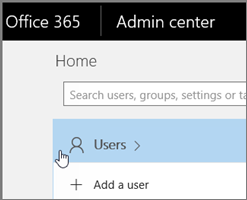
3. Click on User.
4. On the Active Users page, choose the names of the users that you want to delete, and then select Delete user.

Although you deleted the user's account, you're still paying for the license. You can remove your license through our Venti Exchange Portal (See instructions here) if your licenses were purchased through Team Venti. If your licenses were purchased through Microsoft directly, see the instructions below. You can also keep the license to assign to a different user. It won't be assigned to someone automatically.
Stop paying for the license (Microsoft licensing)
To reduce the number of licenses you're paying for until you hire another person, do the following:
- In the Office 365 admin center, choose Billing > Subscriptions. If you don't see this option, you aren't a global admin and can't do this step.
- Choose the subscription (if you have more than one) and then choose Add/Remove licenses to delete the license so you don't pay for it until you hire another person.
- Use the arrows to delete licenses from your subscription.
- Later when you go through the steps to add another person to your business, you'll be prompted to buy a license at the same time, with just one click!
What you need to know about deleting users
- Only people who have Office 365 global admin or User management permissions for the business can delete user accounts.
- After you delete a user, you're still paying for the license that was assigned to them. You need to remove the license from your subscription to stop paying for it.
- You have 30 days to restore the account before the user's data is permanently deleted.
- If you want to keep the user's OneDrive data, move it to a different location. You can even do this up to 30 days after deleting the account.
- If you want to keep the user's email, BEFORE you delete the account, move the email to a different location. If you've already deleted the account: if it's been less than 30 days you can restore it, then move the email data, then delete the account.
- If you have an Enterprise subscription, like Office 365 Enterprise E3, you can preserve the mailbox data of a deleted Office 365 user account by turn it into an inactive mailbox.
- If your business uses Active Directory that is synchronizing with Azure AD, you need to delete the user account from Active Directory. You can't do it through Office 365.
Reset an Office 365 password for your users.
These steps are only for people using an Office 365 business plan. To do them, you need to sign in with your Office 365 admin account. What's an Office 365 admin account?
1. Go to the Office 365 admin center.
2. Go to Users > Active users.
3. Select your users.
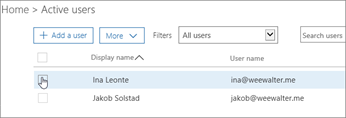
4. Click Reset password.

5. Follow text on page.
Related Articles
Set up Office 365 for business - Office 365
The basic Office 365 setup process, end-to-end The Office 365 setup wizard will guide you through the first step to add other people to your subscription and set up your domain. Then we show you what else you can do to get the most out of Office ...Office 365 Training Resources
End user training resources for Office 365 - Partner Technical Services Blog - Site Home - TechNet Blogs If your organization signed up for Office 365 and you need to start reading email, sharing documents, and more, see the following resources to ...Admin roles in Office 365
Assign admin roles in Office 365 for business. As the person who purchased your Office 365 business subscription, you are the global administrator. This means you have complete control over the Office 365 suite of products. To help you manage Office ...Getting started
Sign-in to Teams Start Teams. Go to https://teams.microsoft.com/ In Windows, click Start button > Microsoft Corporation > Microsoft Teams. On Mac, go to the Applications folder and click Microsoft Teams. On mobile, tap the Teams icon Sign in with ...Office 365 Videos
End user training resources for Office 365 - Partner Technical Services Blog - Site Home - TechNet Blogs The following Office 365 videos are available: Video: Welcome to Office 365 Video: Share Documents in Office 365 Video: Use email and more in ...